
Joey Z’s How to Heelflip! | Shred District Skateboarding Comic

Joey Z’s How to Heelflip! | Shred District Skateboarding Comic
Gear up, learn something new, and find what fits your ride. Joey Z has your back.
- Skater-first gear picks
- Tips from Joey Z
- Ride ready every session


How to Heelflip on a Skateboard: Easy 8-Step Beginner Tutorial
Want to learn how to heelflip on a skateboard? Joey Z and the Shred District crew are here to help!
A heelflip is one of the coolest skateboard tricks you can learn. It combines an ollie, a jump, and a heel flick. The result is a skateboard that flips completely beneath your feet.
Learning how to heelflip takes practice. However, breaking the trick into simple steps makes it easier to understand. In this guide, you’ll learn how to position your feet, pop your skateboard, flick the board, and land safely.
You’ll also discover common heelflip mistakes and how to fix them. Follow along with Joey Z’s eight-page comic tutorial, and let’s get rolling!
What Is a Heelflip in Skateboarding?
A heelflip is a skateboard flip trick that rotates the board one full time along its lengthwise axis. You use your front heel to start the rotation after popping the tail.
The heelflip looks similar to a kickflip. However, the foot movement is different.
- Heelflip: Your front heel flicks the heel-side edge of the skateboard.
- Kickflip: Your front toes flick the toe-side edge of the skateboard.
Both tricks require balance, timing, and control. They also build on the basic ollie.
If you are still learning to ollie, check out our Joey Z How to Ollie Skateboarding Comic. It can help you understand the pop and jump before you try a heelflip.

What You Need Before Learning How to Heelflip
Before you try this skateboard trick, make sure you feel comfortable riding your board.
You should be able to:
- Ride and turn without losing your balance.
- Keep your feet steady on the deck.
- Pop the tail of your skateboard.
- Jump and land with both feet.
- Perform a basic ollie or understand its movements.
You don’t need perfect ollies before trying a heelflip. However, practicing the basics will make learning easier.
Next, find a smooth, open place to skate. Check your skateboard for loose or damaged parts. Wear a helmet and suitable protective gear.
Now you’re ready to learn the eight steps!

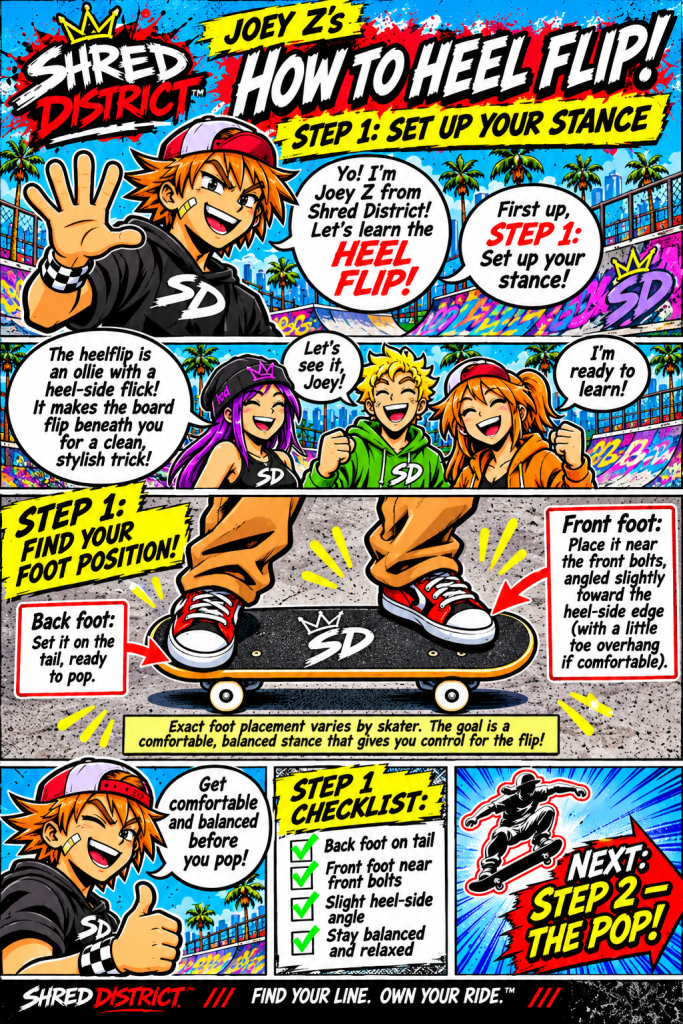
Step 1: Set Up Your Heelflip Stance
<text weight=”semibold”>Start with the right foot position.</text>
Place your back foot near the tail of your skateboard. Keep it in a position that allows you to pop the tail firmly.
Next, position your front foot near the front bolts. Angle it slightly toward the nose. Leave enough room for your heel to reach the edge of the deck.
Your toes can hang slightly over the toe-side edge. Adjust your stance until you can move your front foot comfortably.
Every skateboarder has a slightly different setup. Therefore, don’t worry if your foot position isn’t exactly the same as someone else’s.
Joey Z’s Tip: Keep your shoulders relaxed and your weight centered over the skateboard. A balanced stance gives you a better starting point.

Step 2: Pop the Tail and Jump
Now it’s time to pop your skateboard!
Press your back foot down on the tail. At the same time, jump upward with both feet.
This motion creates the lift you need for a heelflip. Your skateboard rises into the air, giving your front foot room to start the flip.
Try to jump straight up. Keep your shoulders above the board instead of leaning too far forward or backward.
Remember, the heelflip starts with an ollie-style pop. A clean pop helps you control the skateboard during the next step.

Step 3: Flick the Skateboard With Your Heel
This is the most important movement in a heelflip.
As your skateboard rises, guide your front foot toward the nose. Then extend your leg and use your heel to flick the heel-side edge of the deck.
That heel flick starts the board’s rotation.
Don’t simply kick as hard as you can. Instead, focus on making clean contact with the edge. A controlled flick helps the board rotate beneath you.
Joey Z’s Tip: If your skateboard doesn’t flip, check your front-foot position. You may need to adjust where your heel contacts the edge.
Step 4: Let the Skateboard Complete Its Flip
After the heel flick, give your skateboard room to rotate.
Keep your knees bent and your feet above the deck. Watch the skateboard as it turns. You want to see the grip tape return to the top.
Don’t rush the catch. The board needs enough time to complete one full rotation.
Also, keep your body centered. If you jump too far away from the skateboard, landing becomes much harder.
This step takes patience. Keep practicing until you can control the flip and keep the board beneath you.
Step 5: Catch the Heelflip With Your Feet
Once the grip tape faces upward, prepare to catch your skateboard.
Bring your feet back over the deck. Aim for a position near the bolts. This gives you a more stable landing.
You might catch the board with one foot before the other. That’s normal when you’re learning. However, keep working toward catching it with both feet.
As you come down, bend your knees. This helps absorb the impact and keeps your body balanced.
Finally, look ahead and prepare to roll away.
Step 6: Practice Your Heelflip and Improve Your Timing
Your first heelflip may not look perfect. That’s completely normal!
Learning a new skateboard trick takes repetition. Instead of trying to master everything at once, practice one movement at a time.
First, work on your pop. Next, focus on your heel flick. Then practice watching the board and bringing your feet back over the deck.
You can start while standing still. Once you feel more comfortable, try the trick while rolling slowly.
Here are a few ways to improve your heelflip:
- Board won’t flip? Adjust your front-foot position and heel flick.
- Board moves away? Keep your shoulders and weight centered.
- Board only flips halfway? Work on your flick and timing.
- You land with one foot? Practice bringing both feet back over the skateboard.
Most importantly, make small changes. Changing several things at once makes it harder to understand what works.
Step 7: Fix Common Heelflip Mistakes
Having trouble landing a heelflip? Don’t get frustrated. Most skaters experience these problems while learning.
The good news is that small adjustments can make a big difference.
Mistake 1: The Skateboard Doesn’t Flip
Your heel might not be making enough contact with the edge. Your front foot may also be in the wrong position.
How to fix it: Adjust your stance and focus on a clean heel flick. Pay attention to where your heel contacts the board.
Mistake 2: The Skateboard Flies Away
This often happens when you lean too far or jump away from the deck.
How to fix it: Keep your shoulders centered over your skateboard. Try to jump straight up instead of moving sideways.
Mistake 3: The Board Only Flips Halfway
Your flick may be too weak or poorly timed. As a result, the board doesn’t complete its rotation.
How to fix it: Focus on extending your front leg and flicking through the edge. Keep practicing until the board completes one full flip.
Mistake 4: You Land With Only One Foot
You might be jumping away from the skateboard. You may also be rushing the catch.
How to fix it: Watch the board as it rotates. Then bring both feet back over the deck before landing.
Remember, mistakes are part of skateboarding. Make one adjustment at a time, and keep trying!
Step 8: Land Your First Heelflip!
You’ve learned the stance, the pop, and the heel flick. Now it’s time to put everything together!
Start with your feet in position. Pop the tail and jump. Next, flick the skateboard with your heel.
Watch the board complete its rotation. Then catch it with your feet and bend your knees as you land.
Finally, roll away and celebrate!
Your first clean heelflip is a big achievement. It might take many attempts, but every try helps you improve.
Keep practicing, stay confident, and enjoy the progress. Joey Z and the Shred District crew are cheering you on!
Heelflip vs. Kickflip: What’s the Difference?
The heelflip and kickflip share several movements. Both tricks start with a pop and a jump. However, the front-foot flick makes them different.
| Feature | Heelflip | Kickflip |
|---|---|---|
| Foot movement | Heel flick | Toe flick |
| Board rotation | One full flip | One full flip |
| Main contact | Heel-side edge | Toe-side edge |
| Foundation | Ollie | Ollie |
If you already know how to kickflip, some parts of the heelflip may feel familiar. However, the flick and timing require practice.
Try not to treat the two tricks as identical. Focus on learning the correct movement for each one.
7 Tips to Make Your Heelflip Better
Want to improve your skateboard flip tricks? These simple tips can help you build better habits.
- Check your stance. Start with comfortable foot placement.
- Work on your pop. A good pop gives the board room to flip.
- Practice your heel flick. Focus on clean contact instead of kicking harder.
- Stay centered. Keep your shoulders above the skateboard.
- Watch the rotation. Follow the board so you know when to catch it.
- Bend your knees. A relaxed landing helps you stay balanced.
- Practice regularly. Consistent practice helps build confidence and control.
You don’t have to land a heelflip every time to make progress. Even a better flick or a cleaner catch is a step forward.
Keep Learning With Shred District
Learning how to heelflip is an exciting part of your skateboarding journey. Once you get comfortable with this trick, you can work toward even more challenging skateboard tricks.
Shred District is here to help you learn, improve, and enjoy skateboarding.
Explore more lessons in our Skateboarding Guides. You can also visit the Shred District homepage for more skateboarding content, gear, and tutorials.
Want to keep learning with Joey Z? Read our How to Ollie Skateboarding Comic. It’s a great place to review one of the most important foundations in skateboarding.
For additional heelflip instruction, check out these skateboarding resources:
Keep practicing, keep pushing yourself, and remember that every great skater started somewhere.
FIND YOUR LINE. OWN YOUR RIDE.
— The Shred District Crew
Gear check, crew! Keep your setup dialed in, protect your knees, and chase that next clean trick. Find your line. Own your ride!
♛RELATED SKATEBOARD PRODUCTS


RELATED SKATEBOARD GUIDES
 Decks How To Choose Skateboard Deck Size Choosing the right skateboard deck concave and shape can improve comfort, control, and trick performance. Compare deck width, length, wheelbase, and concave to find a skateboard that matches your riding style and feels right under your feet.READ GUIDE ➜
 Wheels Best Skateboard Wheels for Street Skating: Size, Hardness, and Shape Guide Discover the best skateboard wheels for street skating with our guide to wheel size, hardness, shape, and urethane. Learn how to choose 52–54mm wheels, compare 99A durometer options, and find the right setup for flip tricks, ledges, skateparks, and rough pavement. Explore skateboard wheels and essential gear at Shred District to build your ideal ride.READ GUIDE ➜
 Bearings Why Should You Clean Your Skateboard Bearings? Learn how to clean skateboard bearings step by step with this complete skateboard maintenance guide from Shred District. Discover the best cleaning supplies, safe drying methods, proper lubrication techniques, and expert tips to remove dirt, improve rolling performance, and extend bearing life. Keep your skateboard wheels spinning smoothly and your setup ready for your next session.READ GUIDE ➜
 Decks Beginner's Guide to Building a Skateboard: Parts, Tools, and Step-by-Step Assembly Learn how to build a skateboard with this beginner-friendly, step-by-step guide from Shred District. Discover how to choose the right skateboard deck, trucks, wheels, bearings, hardware, and grip tape, plus the tools you need to assemble your board safely. Get expert tips on skateboard setup, component compatibility, wheel size, and final safety checks to create a reliable skateboard tailored to your riding style. Find the gear you need and build your perfect setup with Shred District.READ GUIDE ➜